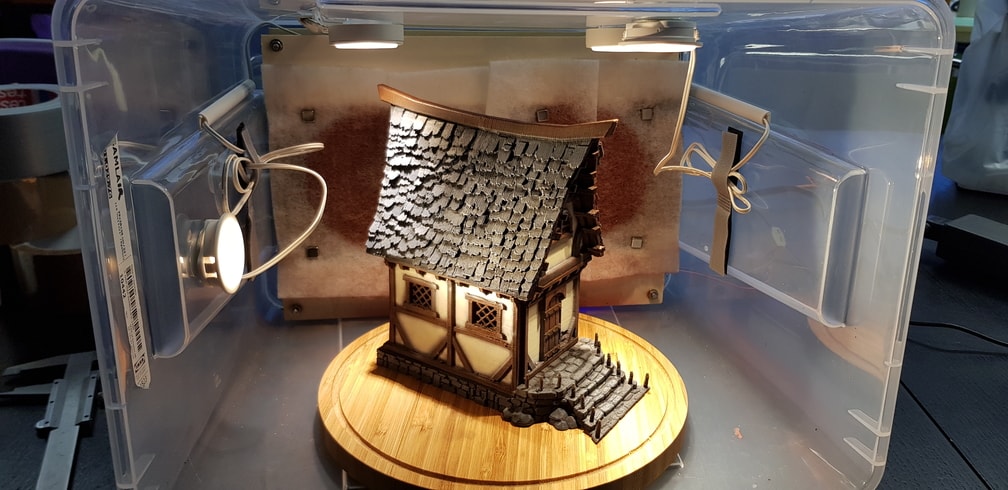
The SAMLAIR Box is a handy chamber for airbrushing built from an IKEA Samla Box and other IKEA components. It utilizes two 120mm PC FANs to create an airflow and suck paint particles away from you and into a filter. Optionally it includes freely positoned lighting, tool storage and a turn table for convenience.
The cost depends on how much spare materials you have and how many features you want but in general should be around 30€
You will need:
1x 22litre IKEA Samla Box (39x28x28)
2x Plywood (4mm) A4
2x PC FAN 120mm (12V)
4x M4 Screw 40mm
8x M4 Hexnut + Washers
~250x150mm Steel Mesh (should be magnetic, check before you buy)
Strips of Filter Material (I used material from a vacuumer)
~8 Neodymium Magnets (strong enough to keep the filter material in place)
Optional (Turntable)
1x IKEA "Oleby"
1x 8mm Inner diameter ball bearing
4+ Felt Gliders
Optional (Light)
LED-Berg Light Dots
24V Power Supply (the one that comes with LED BERG is not Powerful enough)
Linear Regulator 24V->12V (so you can use the FANs and the light with the same power supply)
4x 30mm washer
4x Neodymium Magnet Disc (strong enought to hold a Washer through the box wall. I used 20mm diameter, 2mm thickness)
IKEA Trassla Cable Organizers
Optional (Storage)
1x Ikea Samla Lid (for 22l)
4x Ikea Samla Closing Latch
1x Ikea Samla Tool Insert
Instructions:
1. First lasercut the two plywood sheets according to the .svg file attached (it has 2 layers, one for each sheet).
2. Then mark the cutouts for the fan holes in the bottom of the Samla Box. I have melted through the box with a hot iron since cutting the PP material is very awkward. If you do the same, make sure that everything is well ventilated since there will be a lot of unhealthy fumes.
3. While you are at it, also drill the 4mm holes into the Samla bottom at the positions they have been cut in the plywood (I used a metal drillbit)
4. Next you can attach the PC fans to the lasercut base with the standard screws that are usually included with the fans.
5. Depending on if you want light or not, you need to attach your regulator and the appropriate wires to this base aswell. The Ledberg Dots I used had detachable wires that made this part relatively convenient despite the fact that I shortened a few of the wires to have less clutter in the box afterwards.
6. As soon as you know where your power supply wires will come out of the box, also drill a hole there. Optionally you could use some sort of socket if you have that available.
7. Attach the metal mesh to the "back" of the square-hole plywood sheet. I simply used some tape to secure it on all sides.
8. Now you can align the plywood parts and the bottom of the box and screw everything together with the M4 screws, and hexnuts. Dont forget to thread the powersupply wire out first, as well as all wires that will power the LEDs.
9. Attaching filters to the mesh is done by holding them on with magnets.
10. To allow for variable light positioning, use the gluepads included with the Ledberg to attach the 30mm washers. You can now position the lights by holding them through the Samla's wall with magnets.
11. For the turntable, drill a hole big enough for the outer diameter of the ball bearing into the center of the Ikea Oleby board and an 8mm hole into the side of the Samla at a position where the table can still turn. Click in the printed pivot and press fit your ball bearing into the board.
12. Lastly you can neaten up cable lenghts and hide cables with the included guides or use cable ties and Ikea Trassla to organize the box...
