HackFFM-Duino Chime: Unterschied zwischen den Versionen
DCEM (Diskussion | Beiträge) |
(→Arduino code (for use with SimpleSDAudio library)) |
||
| (13 dazwischenliegende Versionen von 2 Benutzern werden nicht angezeigt) | |||
| Zeile 1: | Zeile 1: | ||
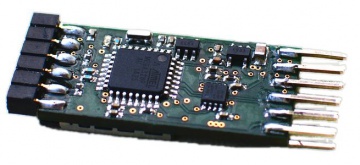
| + | [[Datei:Chime.jpg|360px|right|thumb|HackFFM-Duino Chime alpha version]] | ||
by: [[Benutzer:DCEM|DCEM]] | by: [[Benutzer:DCEM|DCEM]] | ||
| + | |||
== Motivation == | == Motivation == | ||
[[Benutzer:LeandraChristine|LeandraChristine]] needed a small solution for sound in a project. | [[Benutzer:LeandraChristine|LeandraChristine]] needed a small solution for sound in a project. | ||
Since I was designing lots of PCB’s anyway I decided to also realize this one. | Since I was designing lots of PCB’s anyway I decided to also realize this one. | ||
Another requirement was fast responsiveness. The [[SimpleSDAudio]]-library from [[Benutzer:Tut|Tut]] provides just that. [[Benutzer:Tut|Tut]] helped quite a lot with the circuit design in this project. | Another requirement was fast responsiveness. The [[SimpleSDAudio]]-library from [[Benutzer:Tut|Tut]] provides just that. [[Benutzer:Tut|Tut]] helped quite a lot with the circuit design in this project. | ||
| + | |||
| + | We did a [[Reflow Workshop]] to build plenty of them. | ||
== Features == | == Features == | ||
| Zeile 17: | Zeile 21: | ||
Choose between 8bit Stereo or 16bit mono Sound. | Choose between 8bit Stereo or 16bit mono Sound. | ||
| + | |||
| + | Board size: 15 x 30mm(0.6 x 1.2 inches) | ||
| + | |||
| + | 8 Pins are accessible including i²C PINS | ||
| + | |||
| + | == Connections == | ||
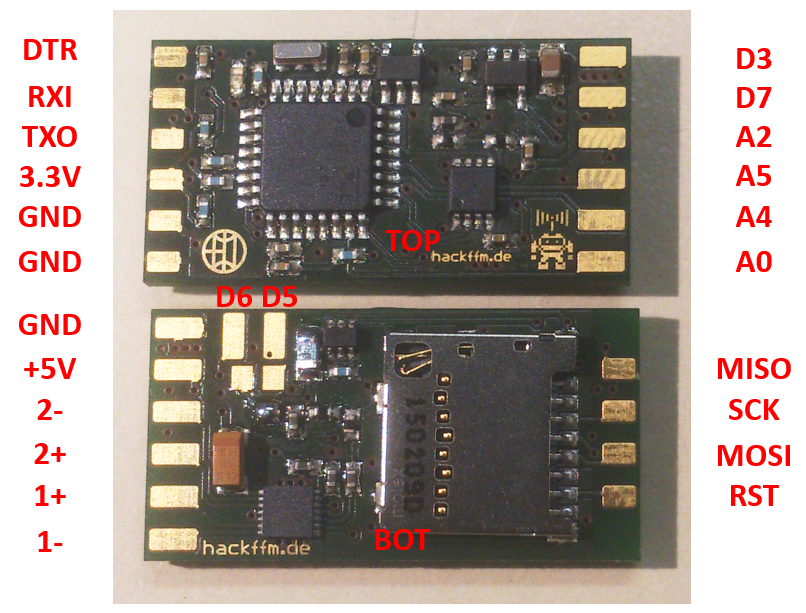
| + | [[Datei:ChimeConnections.png]] | ||
| + | |||
| + | |||
| + | == Design Files == | ||
| + | |||
| + | [https://github.com/DCEM/HackFFM-Duino-Chime HackFFM-Duino-Chime on GitHub] | ||
| + | |||
| + | |||
| + | == Arduino code (for use with SimpleSDAudio library) == | ||
| + | |||
| + | To make sure the code can be uploaded: | ||
| + | |||
| + | |||
| + | Set the Arduino IDE to - Board - Arduino Uno | ||
| + | |||
| + | |||
| + | Supply the pcb with 5V (in addition to your programmer) | ||
| + | |||
| + | |||
| + | Your speaker for this example should be attached to +/-1 | ||
| + | |||
| + | <pre> | ||
| + | /* | ||
| + | Simple SD Audio bare minimum example, plays file EX1.MIX from root folder of SD card. | ||
| + | |||
| + | This example shows how to use the SimpleSDAudio library with Chime | ||
| + | http://hackerspace-ffm.de/wiki/index.php?title=HackFFM-Duino_Chime | ||
| + | |||
| + | See SimpleSDAudio.h or our website for more information: | ||
| + | http://www.hackerspace-ffm.de/wiki/index.php?title=SimpleSDAudio | ||
| + | |||
| + | created 27 Sep 2015 by Lutz Lisseck | ||
| + | */ | ||
| + | #include <SimpleSDAudio.h> | ||
| + | |||
| + | /* Chime Special function block start */ | ||
| + | #define CHIME_GAIN_SW 2 | ||
| + | #define CHIME_GAIN_EN A3 | ||
| + | #define CHIME_SPK_EN A1 | ||
| + | #define CHIME_LED 5 | ||
| + | #define CHIME_SD_DET 8 | ||
| + | #define CHIME_SD_CS 4 | ||
| + | /* gain 0 off, 1 quiet, 2 loud */ | ||
| + | void setupChime(unsigned char gain) { | ||
| + | pinMode(CHIME_GAIN_SW, OUTPUT); | ||
| + | pinMode(CHIME_GAIN_EN, OUTPUT); | ||
| + | pinMode(CHIME_SPK_EN, OUTPUT); | ||
| + | pinMode(CHIME_LED, OUTPUT); digitalWrite(CHIME_LED, LOW); | ||
| + | pinMode(CHIME_SD_DET, INPUT_PULLUP); | ||
| + | switch(gain) { | ||
| + | case 0: // off | ||
| + | digitalWrite(CHIME_SPK_EN, LOW); | ||
| + | digitalWrite(CHIME_GAIN_EN, HIGH); | ||
| + | digitalWrite(CHIME_GAIN_SW, LOW); | ||
| + | break; | ||
| + | case 1: // soft | ||
| + | digitalWrite(CHIME_SPK_EN, HIGH); | ||
| + | digitalWrite(CHIME_GAIN_EN, HIGH); | ||
| + | digitalWrite(CHIME_GAIN_SW, LOW); | ||
| + | break; | ||
| + | default: // loud | ||
| + | digitalWrite(CHIME_SPK_EN, HIGH); | ||
| + | digitalWrite(CHIME_GAIN_EN, LOW); | ||
| + | digitalWrite(CHIME_GAIN_SW, HIGH); | ||
| + | break; | ||
| + | } | ||
| + | SdPlay.setSDCSPin(CHIME_SD_CS); | ||
| + | } | ||
| + | /* Chime Special function block end */ | ||
| + | |||
| + | void setup() | ||
| + | { | ||
| + | // Open serial communications and wait for port to open: | ||
| + | Serial.begin(9600); | ||
| + | |||
| + | setupChime(2); | ||
| + | |||
| + | // Using F("...") to avoid wasting RAM | ||
| + | Serial.print(F("\nInitializing SD card...")); | ||
| + | |||
| + | if (!SdPlay.init(SSDA_MODE_FULLRATE | SSDA_MODE_STEREO | SSDA_MODE_AUTOWORKER)) { | ||
| + | Serial.println(F("initialization failed. Is FAT formated card inserted?")); | ||
| + | Serial.print(F("Error code: ")); | ||
| + | Serial.println(SdPlay.getLastError()); | ||
| + | while(1); | ||
| + | } else { | ||
| + | Serial.println(F("Wiring is correct and a card is present.")); | ||
| + | } | ||
| + | |||
| + | Serial.print(F("Looking for EX1.MIX... ")); | ||
| + | if(!SdPlay.setFile("EX1.MIX")) { | ||
| + | Serial.println(F(" not found on card! Error code: ")); | ||
| + | Serial.println(SdPlay.getLastError()); | ||
| + | while(1); | ||
| + | } else { | ||
| + | Serial.println(F("found.")); | ||
| + | } | ||
| + | |||
| + | Serial.print(F("Playing... ")); | ||
| + | SdPlay.play(); | ||
| + | while(!SdPlay.isStopped()) { | ||
| + | ; // no worker needed anymore :-) | ||
| + | delay(500); | ||
| + | digitalWrite(CHIME_LED, !digitalRead(CHIME_LED)); | ||
| + | } | ||
| + | Serial.println(F("done.")); | ||
| + | SdPlay.deInit(); | ||
| + | } | ||
| + | |||
| + | void loop(void) { | ||
| + | |||
| + | } | ||
| + | </pre> | ||
== License == | == License == | ||
| + | |||
| + | Licensing CC v4.0 Share-Alike (http://creativecommons.org/licenses/by-sa/4.0/) | ||
| + | |||
| + | I started out with the open log design. Although there is not much left of it, it was some help. | ||
| + | |||
| + | I also used libraries from sparkfun and adafruit. | ||
| + | |||
| + | [[Kategorie:Projekte]] | ||
Aktuelle Version vom 18. März 2024, 22:53 Uhr
by: DCEM
Inhaltsverzeichnis
Motivation
LeandraChristine needed a small solution for sound in a project. Since I was designing lots of PCB’s anyway I decided to also realize this one. Another requirement was fast responsiveness. The SimpleSDAudio-library from Tut provides just that. Tut helped quite a lot with the circuit design in this project.
We did a Reflow Workshop to build plenty of them.
Features
The board is carrying:
- Atmega328
- MAX9098306 3.7W stereo Class D amplifier
- SN74LVC2G14 dual Schmitt-Trigger with its own low noise power supply
- microSD-Card Slot
- 74LVC1G53DP Analog Switch, to set the gain of the Class D amplifier (3 levels)
The controller itself is running on 3.3V (because of the SD-Card). The supply voltage is 5V.
Choose between 8bit Stereo or 16bit mono Sound.
Board size: 15 x 30mm(0.6 x 1.2 inches)
8 Pins are accessible including i²C PINS
Connections
Design Files
Arduino code (for use with SimpleSDAudio library)
To make sure the code can be uploaded:
Set the Arduino IDE to - Board - Arduino Uno
Supply the pcb with 5V (in addition to your programmer)
Your speaker for this example should be attached to +/-1
/*
 Simple SD Audio bare minimum example, plays file EX1.MIX from root folder of SD card.

 This example shows how to use the SimpleSDAudio library with Chime
 http://hackerspace-ffm.de/wiki/index.php?title=HackFFM-Duino_Chime

 See SimpleSDAudio.h or our website for more information:
 http://www.hackerspace-ffm.de/wiki/index.php?title=SimpleSDAudio

 created  27 Sep 2015 by Lutz Lisseck
 */
#include <SimpleSDAudio.h>

/* Chime Special function block start */
#define CHIME_GAIN_SW  2
#define CHIME_GAIN_EN  A3
#define CHIME_SPK_EN   A1
#define CHIME_LED      5
#define CHIME_SD_DET   8
#define CHIME_SD_CS    4
/* gain 0 off, 1 quiet, 2 loud */
void setupChime(unsigned char gain) {
  pinMode(CHIME_GAIN_SW, OUTPUT);
  pinMode(CHIME_GAIN_EN, OUTPUT);
  pinMode(CHIME_SPK_EN, OUTPUT);
  pinMode(CHIME_LED, OUTPUT); digitalWrite(CHIME_LED, LOW);
  pinMode(CHIME_SD_DET, INPUT_PULLUP);
  switch(gain) {
    case 0: // off
      digitalWrite(CHIME_SPK_EN, LOW);
      digitalWrite(CHIME_GAIN_EN, HIGH);
      digitalWrite(CHIME_GAIN_SW, LOW);
      break;
    case 1: // soft
      digitalWrite(CHIME_SPK_EN, HIGH);
      digitalWrite(CHIME_GAIN_EN, HIGH);
      digitalWrite(CHIME_GAIN_SW, LOW);
      break;
    default: // loud
      digitalWrite(CHIME_SPK_EN, HIGH);
      digitalWrite(CHIME_GAIN_EN, LOW);
      digitalWrite(CHIME_GAIN_SW, HIGH);
      break;
  }
  SdPlay.setSDCSPin(CHIME_SD_CS);
}
/* Chime Special function block end */

void setup()
{
  // Open serial communications and wait for port to open:
  Serial.begin(9600);

  setupChime(2);

  // Using F("...") to avoid wasting RAM
  Serial.print(F("\nInitializing SD card..."));

  if (!SdPlay.init(SSDA_MODE_FULLRATE | SSDA_MODE_STEREO | SSDA_MODE_AUTOWORKER)) {
    Serial.println(F("initialization failed. Is FAT formated card inserted?"));
    Serial.print(F("Error code: "));
    Serial.println(SdPlay.getLastError());
    while(1);
  } else {
   Serial.println(F("Wiring is correct and a card is present."));
  }

  Serial.print(F("Looking for EX1.MIX... "));
  if(!SdPlay.setFile("EX1.MIX")) {
    Serial.println(F(" not found on card! Error code: "));
    Serial.println(SdPlay.getLastError());
    while(1);
  } else {
   Serial.println(F("found."));
  }

  Serial.print(F("Playing... "));
  SdPlay.play();
  while(!SdPlay.isStopped()) {
    ;	// no worker needed anymore :-)
    delay(500);
    digitalWrite(CHIME_LED, !digitalRead(CHIME_LED));
  }
  Serial.println(F("done."));
  SdPlay.deInit();
}

void loop(void) {

}
License
Licensing CC v4.0 Share-Alike (http://creativecommons.org/licenses/by-sa/4.0/)
I started out with the open log design. Although there is not much left of it, it was some help.
I also used libraries from sparkfun and adafruit.

