Voidnet Viator Cyberdeck: Unterschied zwischen den Versionen
| (2 dazwischenliegende Versionen desselben Benutzers werden nicht angezeigt) | |||
| Zeile 16: | Zeile 16: | ||
'''Links''' | '''Links''' | ||
| − | Video: | + | Video: [https://clipchamp.com/watch/iuDfoU8I1nf] |
Fusion 3d-viewer: [https://a360.co/3SyB80R] | Fusion 3d-viewer: [https://a360.co/3SyB80R] | ||
| Zeile 36: | Zeile 36: | ||
[[Datei:viator_rollmouse.png|300px|]] | [[Datei:viator_rollmouse.png|300px|]] | ||
| + | |||
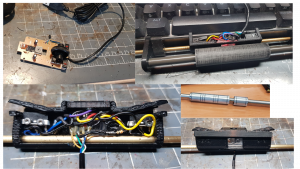
The most time intensive device built for this project is the roll-pin mouse replacement. Electronics were all ripped from a cheap optical mouse but the sensor's used in these devices are very tuned to their purpose. You can not expect to exchange the LED easily or stray more than ~1mm from the surface area you want to detect movement on. | The most time intensive device built for this project is the roll-pin mouse replacement. Electronics were all ripped from a cheap optical mouse but the sensor's used in these devices are very tuned to their purpose. You can not expect to exchange the LED easily or stray more than ~1mm from the surface area you want to detect movement on. | ||
Also the whole optical system is very reliant on the right surface structure and it turned out that roughened PETG was working well. I used an 8mm shaft and combined it first with linear LM8UU bearings, but the haptics did not feel so well. I later swapped the bearings for IGUS Igildur sliding bearings and it heighened the comfort alot. | Also the whole optical system is very reliant on the right surface structure and it turned out that roughened PETG was working well. I used an 8mm shaft and combined it first with linear LM8UU bearings, but the haptics did not feel so well. I later swapped the bearings for IGUS Igildur sliding bearings and it heighened the comfort alot. | ||
| Zeile 41: | Zeile 42: | ||
[[Datei:viator_right.png|300px|]] | [[Datei:viator_right.png|300px|]] | ||
| + | |||
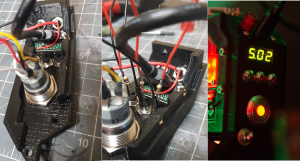
| + | The right side of the deck got a bit cramped because I wanted to include a large, hefty and fun-to-push switch. The LEDs are used to show the charge state of the battery module while the voltage output might come in handy in a future upgrade to supply different voltages from the Cyberdeck directly. | ||
| + | The only part I would change in hindsight is the usb-C loading connector since it took a lot of space and is hard to install. A lower profile option would be better. | ||
[[Datei:viator_inside.png|300px|]] | [[Datei:viator_inside.png|300px|]] | ||
| + | |||
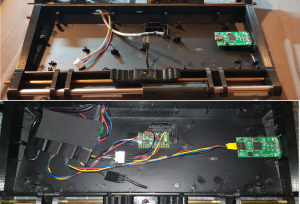
| + | Space was very tight under the keyboard since it is actually angled forward...so the room gets very tight towards the front. For that reason I needed to configure all USB cables myself (and I wanted to keep the usb to plug and unplug easily...or for when I changed my mind during the build). The USB Hub is the most important part here since it links up the roll-pin mouse, the keyboard itself (it loops back in), the signal analyzer and a TEENSY-LC configured as a HID to take input from the PSP Knob at the left side. | ||
| + | Later on I might add a few more functions to the TEENSY with other Buttons or sensors and probably also a way to turn the signal analyzer off when it is not in use to conserve some power. | ||
[[Datei:viator_left.png|300px|]] | [[Datei:viator_left.png|300px|]] | ||
| + | |||
| + | The left side is mainly occupied by the 4-port USB hub (and thankfully I got a relatively small footprint for that) which was a needed feature since I already occupied so much USB on the PI. Besides that the PSP stick has an intuitive spot since the scrolling happens at the side of the screen. The flashlight was a spontaneous addition. After having it on my desk to look for dropped parts during the build I just ended up making it part of the entire Deck. Surprisingly, it works quite nicely because it points the right way when you grip the deck by the handle or when you carry it on the strap. | ||
[[Datei:viator_topangle.png|300px|]] | [[Datei:viator_topangle.png|300px|]] | ||
| + | |||
| + | Originally I had used a laser-acrylic part for this but it ended up not providing enough structure. The alumnium is great because it helps holding everything together with the 8mm shaft for the mouse on the other side and 3x 4mm rods on the inside we have a nice and rigid frame. | ||
[[Datei:viator_panel.png|300px|]] | [[Datei:viator_panel.png|300px|]] | ||
| + | |||
| + | The frame itself was too large for my printer so I made parts and clips. After clipping it together the clips can be melted to the frame so it becomes one piece. | ||
| + | The front panel was a bit of a modular part because I wanted to be able to assemble it outside of the actual deck. It has space for all the additional displays and then just clips into the main frame. | ||
[[Datei:viator_wiring.png|300px|]] | [[Datei:viator_wiring.png|300px|]] | ||
| + | |||
| + | At the end I was quite surprised by how many wires were needed for all the switches, Leds and I2C devices but since I will probably use other I2C parts in the future, I glued some WAGO clamps to the back which hold the I2C bus accessible. I might switch out the clips for something more "cyber" looking in the future. | ||
Aktuelle Version vom 29. September 2022, 20:51 Uhr
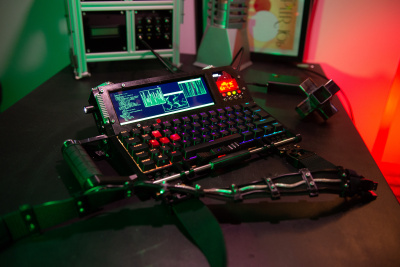
A savage, retro-cyberpunk inspired Cyberdeck with a thrilling human interface, finished for the Hackaday Cyberdeck challenge 2022.
The custom made high ergonomic roll-pin mouse pointer allows typing on the mechanical keyboard and mouse movement in the same hand position. This interface is supported by a wide-screen touchscreen, a psp-knob used for scrolling, stereo speakers, USB Hub, a tiny status OLED, GPIO switches and LEDs, and an elaborate visualization of the currently used memory. To enable project building, 5V power is supplied via two banana jacks and a 8 channel signal analyzer mounted under the keyboard. Highly portable with a grip handle, cable-organizing shoulder strap, a flashlight and two 18650 Lion cells the Viator is a viable companion for your next run.
Links
Video: [1]
Fusion 3d-viewer: [2]
Github: [3]
Build
3d-Files If you wish to build a similar device you can probably use a lot of the printed parts, while modifying others to suit your needs.
The parts are available on github: https://github.com/LeandraChristine/voidnet_viator
The most time intensive device built for this project is the roll-pin mouse replacement. Electronics were all ripped from a cheap optical mouse but the sensor's used in these devices are very tuned to their purpose. You can not expect to exchange the LED easily or stray more than ~1mm from the surface area you want to detect movement on. Also the whole optical system is very reliant on the right surface structure and it turned out that roughened PETG was working well. I used an 8mm shaft and combined it first with linear LM8UU bearings, but the haptics did not feel so well. I later swapped the bearings for IGUS Igildur sliding bearings and it heighened the comfort alot. The casing for the chip (and optics) as well as the distance to the pin were printed more times than I can count to get it right, but the result is a mouse replacement that allows you to keep your hand in 10-finger-typing postion while moving and using a mouse!
The right side of the deck got a bit cramped because I wanted to include a large, hefty and fun-to-push switch. The LEDs are used to show the charge state of the battery module while the voltage output might come in handy in a future upgrade to supply different voltages from the Cyberdeck directly. The only part I would change in hindsight is the usb-C loading connector since it took a lot of space and is hard to install. A lower profile option would be better.
Space was very tight under the keyboard since it is actually angled forward...so the room gets very tight towards the front. For that reason I needed to configure all USB cables myself (and I wanted to keep the usb to plug and unplug easily...or for when I changed my mind during the build). The USB Hub is the most important part here since it links up the roll-pin mouse, the keyboard itself (it loops back in), the signal analyzer and a TEENSY-LC configured as a HID to take input from the PSP Knob at the left side. Later on I might add a few more functions to the TEENSY with other Buttons or sensors and probably also a way to turn the signal analyzer off when it is not in use to conserve some power.
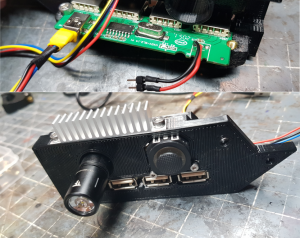
The left side is mainly occupied by the 4-port USB hub (and thankfully I got a relatively small footprint for that) which was a needed feature since I already occupied so much USB on the PI. Besides that the PSP stick has an intuitive spot since the scrolling happens at the side of the screen. The flashlight was a spontaneous addition. After having it on my desk to look for dropped parts during the build I just ended up making it part of the entire Deck. Surprisingly, it works quite nicely because it points the right way when you grip the deck by the handle or when you carry it on the strap.
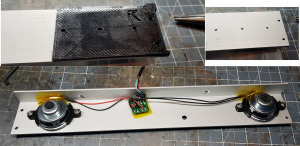
Originally I had used a laser-acrylic part for this but it ended up not providing enough structure. The alumnium is great because it helps holding everything together with the 8mm shaft for the mouse on the other side and 3x 4mm rods on the inside we have a nice and rigid frame.
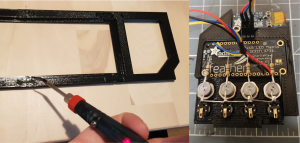
The frame itself was too large for my printer so I made parts and clips. After clipping it together the clips can be melted to the frame so it becomes one piece. The front panel was a bit of a modular part because I wanted to be able to assemble it outside of the actual deck. It has space for all the additional displays and then just clips into the main frame.
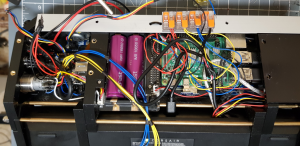
At the end I was quite surprised by how many wires were needed for all the switches, Leds and I2C devices but since I will probably use other I2C parts in the future, I glued some WAGO clamps to the back which hold the I2C bus accessible. I might switch out the clips for something more "cyber" looking in the future.
Scripts
BOM
Other than the 3d printed parts (all FDM parts printed in black PETG, all Resin printed in Elegoo ABS-like clear-red) the following was used:
Base
- Raspberry Pi 4 (+SD card)
- Corsair K65 RGB 60% mechanical keyboard (don't get too attached to it)
- Waveshare Raspberry Pi 7.9 inch Capacitive LCD HDMI Display 400 x 1280 (comes with great Raspi HDMI and USB connectors)
- Geekworm Raspberry Pi UPS, X728 V2.1 (or alternative)
- 2x 18650 (unprotected due to the X728 spacing) Lion cells
- 2x Goobay 4-Port USB 2.0 Hub (needs a super slim form factor to fit. I used this: https://www.berrybase.de/4-port-usb-2.0-hub-mit-0-4m-anschlusskabel-farbe-schwarz)
- Stero USB Speaker (2 x 0,5W, I used: https://www.berrybase.de/externer-usb-mini-lautsprecher-schwarz)
- Alumnium Angle 40mm x 20mm, cut to a length of 290mm (the 3d files include 2 drill-guides to help get the holes right)
- 3x 4mm Brass rods ~330mm length (cut a 1m part into 3, to clamp the 3d printed parts cut a thread at the end of each rod)
- M4 Nuts to secure the clamping shell to the brass rods
- M2 cylinder screws of various lengths ()
- M2.5 screws and standoffs of various lengths (for the raspi, USP and waveshare display)
- M3 cylinder screws of various lengths ()
- Wiring (e.g. 0.14mm), Connectors and general soldering stuff
- Some USB and MINI-USB connectors to solder (to configure custom wires that are slim enough below the keyboard)
- Threaded inserts / Knurled Nuts (M3) (pretty much used everywhere)
- (optional) microSD / T-Flash to microSD extension (to get to the SD card easier)
Rolling mouse
- 8mm stainless steel shaft
- 3x IGUS drylin® R Lineargleitbuchse RJUM-01 (or LM8UU, but it will not feel as nice and smooth)
- optics, chip and bits off a cheap, wired, optical mouse (I used ISY ICM-1000, which has a A2803 optical mouse sensor: http://www.nst-ic.com/nstfileupload/productsinfo/20190703095231_293.pdf)
Additional Features
- Adafruit 15x7 CharliePlex LED Matrix Display FeatherWing - Red
- Adafruit OLED for Raspberry Pi Pico, 128x32, I2C (scratch that, it died randomly and was replaced by a Generic 0.91 Inch, White 128X32 I2C OLED)
- AZDelivery Logic Analyzer 8 CH, 24MHz
- 2x 4mm Banana Jacks (22mm length, one red, one black...I did not like the red I got so a 3d file for resin printing your own is included)
- InLine 33441G USB 3.1 Adaptercable Male C to Female C (for the charging port connected to the UPS)
- 0.28" mini Digital Voltmeter Display
- (optional) 4x WAGO 221-412 2 Fach clamps (to expose the I2C Bus on the backside)
- PSP Slim analog Controller Joystick
- Teensy LC (to generate a HID Keyboard and Mouse, you can try a different controller here....but I had some issues with the Circuitpython ones)
- 7x different color 5mm LEDS (and resistors matched to the GPIO output)
- 7x LED housing for 5mm leds (I used Signal Construct 1089)
- 4x Miniature Toggle Switch (I scavenged for these, you can also use any other switches or buttons that fit in the front panel)
- Hefty, vandalism-safe Button with LED indicator for 10mm hole (power button, there is plenty of space reserved for this in the housing so even longer models should fit)
- 5mm hole momentary switch (for below the screen, wired to the waveshare display's on/off switch so it can be used to conserve power)
Handle
- Bike Handle Grip (Diameter: ~24 mm. Length: ~ 110 mm, cut to size)
- Aluminum Pipe 24mm OD, 20mm ID
- M5 threaded rod ~140mm length
- 2x M5 Ring nut (screws to the threaded rod)
Strap
- 2x Tactical Belt (so you get two buckles to remove the strap completely)
- Some more M3 Bolts & Nuts
- USB or other cables you wish to carry
- Cable ties (to attach the belt-buckles to the 4mm rods on the main case)
Greeblies
- 2x CPU cooler above the speaker covers
- 1x rectangular cooler on the left side
Experimental
- SMALLRIG Ultra Slim 4K HDMI Kabel Micro HDMI Male to Full HDMI Female 14cm (to expose the 2nd HDMI output on the back, but so far I did not get that to work nicely)
