MembraneBreathCtrl: Unterschied zwischen den Versionen
Tut (Diskussion | Beiträge) |
Tut (Diskussion | Beiträge) |
||
| Zeile 29: | Zeile 29: | ||
All parts are laser-cut from a very thin (0.5mm) like acrylic sheet and a thicker (4mm) acrylic plate. The 0.5mm acrylic is more like a foil and much more flexible than the 4mm glass like sheets. These are the files with the laser cut parts made with Inkscape: | All parts are laser-cut from a very thin (0.5mm) like acrylic sheet and a thicker (4mm) acrylic plate. The 0.5mm acrylic is more like a foil and much more flexible than the 4mm glass like sheets. These are the files with the laser cut parts made with Inkscape: | ||
| − | * | + | * Datei:MembranBreathConttrolThinPlexi.svg for thin (0.5mm) acrylic |
| − | * | + | * Datei:MembranBreathConttrolThickPlexi.svg for thick (4mm) acrylic |
<gallery perrow="4" caption="MembraneBreathCtrl assembly"> | <gallery perrow="4" caption="MembraneBreathCtrl assembly"> | ||
Version vom 8. Januar 2022, 01:08 Uhr
Inhaltsverzeichnis
[Verbergen]Features
- Breath controller
- Send control change messages via Midi to DAW (CC2 breath control)
- Fast and responsive (200 Hz CC2 update rate)
- Easy to clean and easy to dry - pressure sensor can be opened via a slide
- Based on a linear Hall-sensor and two magnets on a membrane cut out of a rubber glove
- X/Y Joystick
- Sends 4 additional CCs
- Optical metronome
- Uses internal RGB LED
- Indicates Beat 1, 2, 3, 4 of optically (no annoying click-sound)
- Easy to use with Ableton Live - just activate "Sync" on Midi-Out in Preferences
- Alternative control of RGB via note velocity (send notes C, D, E to device, velocity = brightness)
- Full DIY
- Based on Adafruit Trinket M0
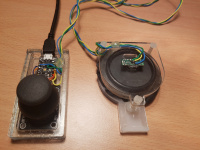
- All parts laser cut from 0.5 and 4mm acrylics
- No hard-to-get special pressure sensor
Breath controller
Background
To play wind instruments more realistic if you are a keyboard player, a breath-controller is a good option: You select the notes to play with your keyboard, but the sound is triggered and articulated based on your breath.
==
How it is build
Usually people (like me) use instructions like this only for own inspirations, so this is not meant to be a full "how-to-build" instruction, but it should give you enough insights to do so if you want. In the rare case you really build this and make it to work please drop us a mail :-)
All parts are laser-cut from a very thin (0.5mm) like acrylic sheet and a thicker (4mm) acrylic plate. The 0.5mm acrylic is more like a foil and much more flexible than the 4mm glass like sheets. These are the files with the laser cut parts made with Inkscape:
- Datei:MembranBreathConttrolThinPlexi.svg for thin (0.5mm) acrylic
- Datei:MembranBreathConttrolThickPlexi.svg for thick (4mm) acrylic
- MembraneBreathCtrl assembly


